Naive Bayes Classifier 실습1 NLTK
1. 필요한 라이브러리, 패키지, 데이터 불러오기
from nltk.tokenize import word_tokenize
import nltk
import numpy
import scipy


# 학습 데이터
train = [('I like you', 'pos'),
        ('I hate you', 'neg'),
        ('You like me', 'neg'),
        ('I like her', 'pos')]
2. 학습 데이터에서 문장과 단어 분리하고 포함여부 확인하기
# word.lower() for sentence in train: 학습용 데이터에서 문장 가져와 소문자로
# for word in word_tokenize(sentence[0]): 소문자로 만든 것 중 sentence[0]을 tokenize한 word 가져오기
all_words = set(word.lower() for sentence in train
               for word in word_tokenize(sentence[0]))
all_words


# for x in train: train에서 x 한 줄 한 줄 가져오기
# {word: (word in word_tokenize(x[0])) for word in all_words}: all_words의 word 중 (word in word_tokenize(x[0])에 포함되면 0 아니면 1
t = [({word: (word in word_tokenize(x[0])) for word in all_words}, x[1])
    for x in train]
t
3. NaiveBayesClassifier 학습하고 결과 확인하기
: 각 단어를 positive와 negative 중 무엇으로 판단할지를 비율로 보여준다
classifier = nltk.NaiveBayesClassifier.train(t)
classifier.show_most_informative_features()
4. 훈련 데이터를 전처리하고 예측하기
# 테스트 데이터
test_sentence = 'I like MerRul'


# 테스트 데이터의 feature만 추출
test_sent_features = {word.lower(): (word in word_tokenize(test_sentence.lower()))
                                     for word in all_words}
test_sent_features


# 모델 평가: pos
classifier.classify(test_sent_features)
NaiveBayesClassifier 실습2: TextBlob
1. 필요한 패키지, 라이브러리, 데이터 불러오기
from textblob import TextBlob
from textblob.classifiers import NaiveBayesClassifier


# 데이터셋
train = [
    ('I love this sandwich.', 'pos'),
    ('This is an amazing place!', 'pos'),
    ('I feel very good about these beers.', 'pos'),
    ('This is my best work.', 'pos'),
    ("What an awesome view", 'pos'),
    ('I do not like this restaurant', 'neg'),
    ('I am tired of this stuff.', 'neg'),
    ("I can't deal with this", 'neg'),
    ('He is my sworn enemy!', 'neg'),
    ('My boss is horrible.', 'neg')
]

test = [
    ('The beer was good.', 'pos'),
    ('I do not enjoy my job', 'neg'),
    ("I ain't feeling dandy today.", 'neg'),
    ("I feel amazing!", 'pos'),
    ('Gary is a friend of mine.', 'pos'),
    ("I can't believe I'm doing this.", 'neg')
]
2. 모델 학습 후 평가하기
# 모델 학습
cl = NaiveBayesClassifier(train)


# 새로운 데이터 분류하기
cl.classify('Their burgers are amazing') #pos
cl.classify('I do not like their pizza') #neg


# 여러 문장 한번에 분류하기
blob = TextBlob("The beer was amazing. "
                "But the hangover was horrible. My boss was not happy.",
                classifier=cl)

blob.classify() # 첫 문장은 긍정이나 뒤의 두 문장이 부정이므로 전체 부정으로 판단

for sentence in blob.sentences:
    print(sentence)
    print(sentence.classify())


# 모델 평가하기
cl.show_informative_features(5)
cl.accuracy(test)
네이버 지식인 소셜분석 파싱 실습
1. 필요한 패키지, 라이브러리, 데이터 불러오기
# 입력한 url을 쫓아가 원본코드를 텍스트로 가져옴 / 원하는 항목만 가져옴
from bs4 import BeautifulSoup
from urllib.request import urlopen
from tqdm import tqdm_notebook
import urllib
import time
import pandas as pd
import numpy as np


# 한국어 폰트 오류
import platform
import matplotlib.pyplot as plt

%matplotlib inline

path = "c:/Windows/Fonts/malgun.ttf"
from matplotlib import font_manager, rc
if platform.system() == 'Darwin':
    rc('font', family='AppleGothic')
elif platform.system() == 'Windows':
    font_name = font_manager.FontProperties(fname=path).get_name()
    rc('font', family=font_name)
else:
    print('Unknown system... sorry~~~~')


# 출력 시 축 위치
plt.rcParams['axes.unicode_minus'] = False


# 데이터 가져올 경로와 키워드
tmp1 = 'https://search.naver.com/search.naver?where=kin' # 네이버 지식 검색 url
html = tmp1 + '&sm=tab_jum&ie=utf8&query={key_word}&start={num}' # key_word: 키워드, num: 페이지번호

response = urlopen(html.format(num=1, key_word=urllib.parse.quote('여자 친구 선물')))
soup = BeautifulSoup(response, "html.parser")
soup
2. 해당 웹페이지에서 특정 정보만 긁어오기
교수님께서 작성하신 예제 코드인데 이대로 실행하면 present_candi_text가 공란이다. 해결코드는 아래 실습2에 적어놨다.
# 개발자도구 - Elements에서 원하는 경로 확인 후 입력
tmp = soup.find_all('ul')


# tmp내 문장들을 tmp_list에 추가
tmp_list = []
for line in tmp:
    tmp_list.append(line.text)
tmp_list


# '여자 친구 선물' 키워드가 있는 정보를 1페이지에서 10000페이지까지 10 단위로 긁어옴
present_candi_text = []

for n in tqdm_notebook(range(1, 10000, 10)):
    response = urlopen(html.format(num=n, key_word=urllib.parse.quote('여자 친구 선물')))
    soup = BeautifulSoup(response, "html.parser")
    tmp = soup.find_all('dl')

    for line in tmp:
        present_candi_text.append(line.text)

    time.sleep(0.5) # 페이지 가져올 때마다 0.5초 단위로 긁어옴


present_candi_text
3. 가져온 데이터를 처리할 수 있는 텍스트로 가공하기
import nltk
from konlpy.tag import Twitter
t = Twitter()


# 가져온 데이터를 문장단위로 분류하기
present_text = ''

for each_line in present_candi_text[:10000]:
    present_text = present_text + each_line + '\n'
present_text


# 형태소 분석기
tokens_candy = t.morphs(present_text)
tokens_candy
candy = nltk.Text(tokens_candy, name='여자 친구 선물')
candy.vocab().most_common(100)


# 제외 단어
stop_words = ['.','가','요','답변','...','을','수','에','질문','제','를','이','도',
                      '좋','1','는','로','으로','2','것','은','다',',','니다','대','들',
                      '2017','들','데','..','의','때','겠','고','게','네요','한','일','할',
                      '10','?','하는','06','주','려고','인데','거','좀','는데','~','ㅎㅎ',
                      '하나','이상','20','뭐','까','있는','잘','습니다','다면','했','주려',
                      '지','있','못','후','중','줄','6','과','어떤','기본','!!',
                      '단어','선물해','라고','중요한','합','가요','....','보이','네','무지']

tokens_candy = [each_word for each_word in tokens_candy if each_word not in stop_words]
candy = nltk.Text(tokens_candy, name='여자 친구 선물')


# 빈도가 높은 단어 50개만 가져오기
candy.vocab().most_common(50)

plt.figure(figsize=(15,6))
candy.plot(100)
plt.show()
4. Word Cloud 생성하기
from wordcloud import WordCloud, STOPWORDS
from PIL import Image

data = candy.vocab().most_common(300)

wordcloud = WordCloud(font_path='c:/Windows/Fonts/malgun.ttf',
                      relative_scaling = 0.2,
                      background_color='white',
                      ).generate_from_frequencies(dict(data))
plt.figure(figsize=(16,8))
plt.imshow(wordcloud)
plt.axis("off")
plt.show()
Naive Bayes Classifier 실습3: 스팸 메일 분류하기
나이브 베이즈 분류식을 가지고, 입력 텍스트로부터 해당 텍스트가 정상 메일인지 스팸 메일인지를 구분하는 작업을 한다. you free lottery 메일이 왔을때 스팸인지 아닌지 구하시오
- 메일로부터 토큰화 및 정제 된 단어들 분류
- me free lottery 스팸 메일
- free get free you 스팸 메일
- you free scholarship 정상 메일
- free to contact me 정상 메일
- you won award 정상 메일
- you ticket lottery 스팸 메일
1. 필요한 패키지, 라이브러리, 데이터 불러오기
from nltk.tokenize import word_tokenize
import nltk
import numpy
import scipy

train = [('me free lottery', 'spam'),
        ('free get free you', 'spam'),
        ('you free scholarship', 'norm'),
        ('free to contact me', 'norm'),
        ('you won award', 'norm'),
        ('you ticket lottery', 'spam')]
2. 데이터 전처리 및 모델 학습하기
all_words = set(word.lower() for sentence in train
               for word in word_tokenize(sentence[0]))
all_words

t = [({word: (word in word_tokenize(x[0])) for word in all_words}, x[1])
    for x in train]

classifier = nltk.NaiveBayesClassifier.train(t)
classifier.show_most_informative_features()
3. 스팸 분류하기: spam
test_sentence = 'you free lottery'

test_sent_features = {word.lower(): (word in word_tokenize(test_sentence.lower()))
                                     for word in all_words}
test_sent_features
classifier.classify(test_sent_features)
네이버 지식인 소셜분석 파싱 실습2
'크리스마스', '데이트' 를 주제로 네이버 지식검색의 내용을 파싱하여, 불용어를 제거하고 word cloud를 만들어 상위 단어 3개를 가져온다.
1. 필요한 패키지, 라이브러리, 데이터 가져오기
from bs4 import BeautifulSoup
from urllib.request import urlopen
import urllib
import time
import pandas as pd
import numpy as np


import platform
import matplotlib.pyplot as plt

%matplotlib inline

path = "c:/Windows/Fonts/malgun.ttf"
from matplotlib import font_manager, rc
if platform.system() == 'Darwin':
    rc('font', family='AppleGothic')
elif platform.system() == 'Windows':
    font_name = font_manager.FontProperties(fname=path).get_name()
    rc('font', family=font_name)
else:
    print('Unknown system... sorry~~~~')


plt.rcParams['axes.unicode_minus'] = False


tmp1 = 'https://search.naver.com/search.naver?where=kin'
html = tmp1 + '&sm=tab_jum&ie=utf8&query={key_word}&start={num}'

response = urlopen(html.format(num=1, key_word=urllib.parse.quote(['크리스마스', '데이트'])))

soup = BeautifulSoup(response, "html.parser")
soup
2. 해당 웹페이지에서 특정 정보만 긁어오기
아무래도 'dl' 경로가 비어있어서 안 긁어와지는 듯 하다. 그래서 'ul'로 대체했더니 정상적으로 긁어와진다.
chr_date_text = []

for line in tmp:
    tmp_list.append(line.text)
tmp_list

for n in tqdm_notebook(range(1, 10000, 10)):
    response = urlopen(html.format(num=n, key_word=urllib.parse.quote('크리스마스', '데이트')))
    soup = BeautifulSoup(response, "html.parser")

    tmp = soup.find_all('ul')

    for line in tmp:
        chr_date_text.append(line.text)

    time.sleep(0.5) # 페이지 가져올 때마다 0.5초 단위로 긁어옴

chr_date_text
3. 가져온 데이터를 처리할 수 있는 텍스트로 가공하기
import nltk
from konlpy.tag import Twitter
t = Twitter()

chr_text = ''

for each_line in chr_date_text[:10000]:
    chr_text = chr_text + each_line + '\n'
chr_text

tokens_chr = t.morphs(chr_text)
tokens_chr
chr = nltk.Text(tokens_chr, name='여자 친구 선물')
chr.vocab().most_common(100)

stop_words = ['.','가','요','답변','...','을','수','에','질문','제','를','이','도',
                      '좋','1','는','로','으로','2','것','은','다',',','니다','대','들',
                      '2017','들','데','..','의','때','겠','고','게','네요','한','일','할',
                      '10','?','하는','06','주','려고','인데','거','좀','는데','~','ㅎㅎ',
                      '하나','이상','20','뭐','까','있는','잘','습니다','다면','했','주려',
                      '지','있','못','후','중','줄','6','과','어떤','기본','!!',
                      '단어','선물해','라고','중요한','합','가요','....','보이','네','무지']

tokens_chr = [each_word for each_word in tokens_chr if each_word not in stop_words]
chr = nltk.Text(tokens_chr, name='크리스마스 데이트')


# 빈도가 높은 단어 50개만 가져오기
chr.vocab().most_common(50)


plt.figure(figsize=(15,6))
chr.plot(100)
plt.show()
4. Word Cloud 생성하기
시간을 들여서 '!' '/' '@' 'Q' 'A' '저장' 등을 Stop Words로 추가해야할 듯 하다.
import nltk
from wordcloud import WordCloud, STOPWORDS

data = chr.vocab().most_common(200)
wordcloud = WordCloud(font_path='C:\Windows\Fonts\malgun.ttf',relative_scaling=0.2,
                      background_color='white').generate_from_frequencies(dict(data))# 이미 빈도순으로 정열된 데이터를 사용할 때

plt.figure(figsize=(10,5))
plt.imshow(wordcloud)
plt.axis('off')
plt.show()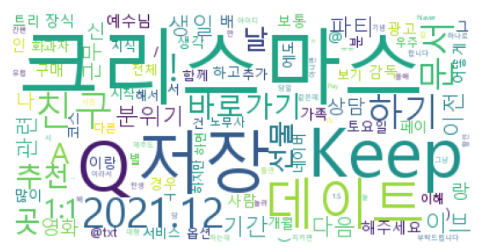
'데이터 청년 캠퍼스 > SQL | 군집분석 | 소셜분석' 카테고리의 다른 글
| [SQL] 데이터 정의어 / 무결성 제약조건 / SELECT문 / 실습 (0) | 2022.07.24 |
|---|---|
| [SQL] 데이터베이스 개요 / 오라클 설치 및 수행 (0) | 2022.07.24 |
| [소셜분석] Word Cloud 실습 - 앨리스, 스타워즈, 헌법 (0) | 2022.07.14 |
| [소셜분석] 윈도우) Anaconda3(Python), JAVA, KoNLPy 라이브러리 설치 (0) | 2022.07.14 |
| [소셜분석] 자연어 분석 KoNLPy 라이브러리 설치 및 실습 (0) | 2022.07.13 |
